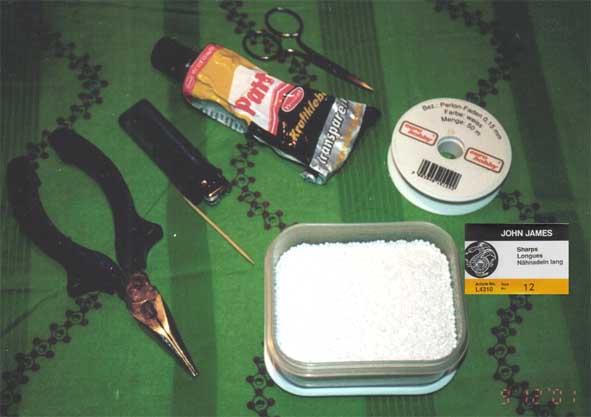
2. Materials
2.0.
Leather and Cloth
2.1. Pencil
2.2. Scissors
2.3. Flat Nosed Pliers
2.4. Needles
2.5.
Thimbles
2.6. Awl
2.7. Beads
2.8. Thread
2.9. Sinew
2.0.
Leather and Cloth 
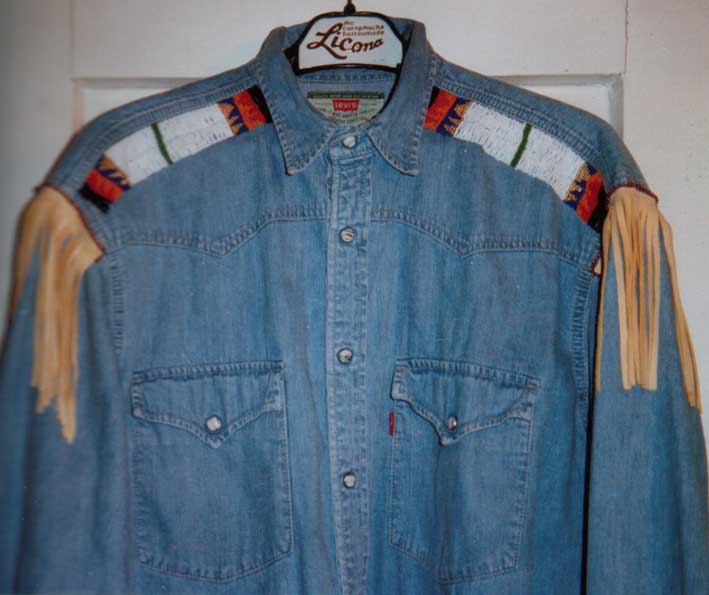
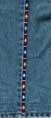
When
you are planning to start with beadwork you have to know what you want to
do and on what kind of material you want to work on. Several materials were
used by Native Americans. Most of the times soft materials like hides (mostly
brain-tanned), woolen cloth and canvas were beaded on (for clothing) and sometimes
even stiff materials such as rawhide or harness leather (for bags).
If
you want to make a dress, you can take buckskin and woolen cloth for instance.
You have to consider, that leather is a lot heavier than cloth but in some
situations you have to take it, e.g. when you plan to work on a Pow Wow Dance
Outfit for the Women's Northern Buckskin Dance.
SEE What
is a Pow Wow?
The
buckskin should be firm enough to support your beadwork, but also soft enough
for the needle to pass through without having to take an awl and prepunch
holes. Otherwise, you would enjoy your work not for long.
If you once started to bead on buckskin and felt it in your hands, you probably
don't want to take any other material. But the technique of beading can be
used to make a lot of other things. You can also take beadwork and decorate
other materials and objects. I learned that it is best to take a fabric which
does not stretch like it is used for Jeans. When you have Jeans, which you
wanted to throw away because you get bored wearing them, try a little beadwork
to pep them up.

I've also seen some beadwork on baseballcaps.

2.1.
Pencil
First
of all, you will need a pencil to draw your designs
on the leather. The best choice is a very soft one, so that you can make the
lines very easily with one stroke. The alternative is to use a ballpoint pen.
Here it is important, that you draw the lines very lightly. Then while beading
the piece you have to take care to conceal the lines within the stitches although
the lines will fade at a longer time in the sunlight. Practice on a piece
of scrap to get the right feeling with your pen. What you should avoid, is
the use of felt-tipped pens. Lines drawn with them do not fade and when the
workpiece gets wet they are likely to bleed.
2.2.
Scissors
It
is recommended, that you have three different types of scissors at hand. One
for cutting cloth and leather, a second for cutting paper like patterns (if
you use the scissors designed for cloth the blades will go dull in no time!)
and a third should be a small one for cutting threads and making small repairs.
2.3.
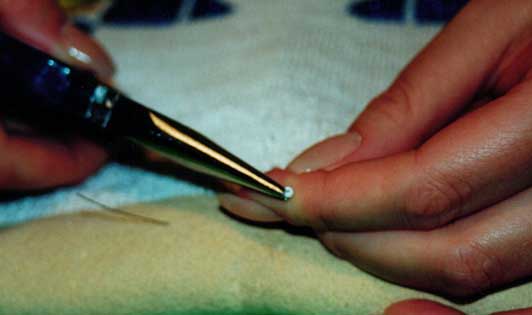
Flat-nosed Pliers
Sometimes
it is necessary to break surplus or oddly shaped beads in a bead row, which
is already sewn down. Isolate the bead you want to break on top of your index
finger, so that enough thread is exposed on both sides. Stretch the thread
taut, place the noses of the pliers around the upper half of the bead and
squeeze them together carefully so that the thread is not near to be cut by
accident.
If
it happens, that the thread is cut, you can simply repair the damage: just
open a few stitches, that the thread is long enough to sew it up.
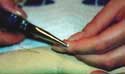
CAREFUL! Close your eyes or look away
to prevent getting hurt by jumping pieces of the cracking beads.
The
pliers can also come in handy, when you encounter a hard spot in the leather.
No matter how soft your buckskin might be, there are always small spots, which
come from insect bites that suffered the live animal. The pliers will help
you to pull the needle through.
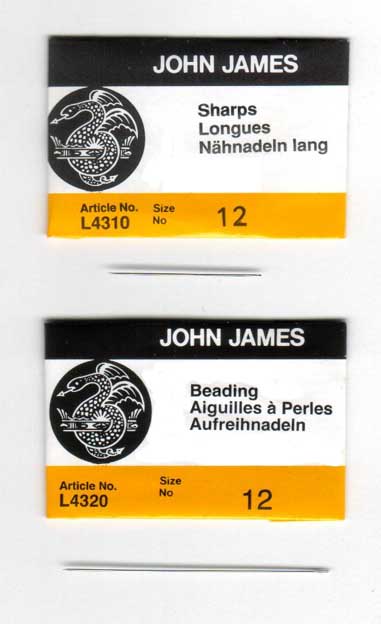
2.4.
Needles
There
is one important thing: You should use the smallest needle possible for your
work, because it is easier to work with. The best are the so called "sharps"
which have a thin eye.
The upper, shorter needles are especially for usual beadwork,
while the lower, longer needles are used for woven beadwork.
The size of the beads should correspond with the size of the needles. The
bigger the number, the smaller are the beads and the needles. For example:
beads with the size of 14 are smaller than beads with the size of 12. But
the thinner a needle, the easier it might break during use. Keep always a
good supply at hand.
2.5.
Thimbles
I
don't recommend the use of conventional thimbles made of steel. They have
a very smooth surface and it is possible that you slip off with the needle
and hurt yourself or that the needle breaks, because you don't have the feeling
how hard you can push it through the leather. In addition you have to feel
the needle's eye on the bare tip of your finger to make sure, each stitch
has the accurate length. When you push the needle through the leather (or
cloth), your middle finger aids the thumb and index finger.
The best thing to protect your fingertips (especially the thumb) from callouses,
is to use thimbles made of buckskin or other soft leather. You can easily
make it yourself: take a piece of scrap, place it on your thumb and glue the
ends around your finger that it fits tight.
Remember: leather stretches out a little, when used often so it has
to be tight in the beginning. If you make it a bit wider it is very likely
that you lose it after a while of use.
2.6.
Awl
You
will only need an awl, when you work on a stiff leather or other material,
which needs to prepunched. Also if you work on buckskin and come to a hard
spot, an awl comes in handy.
2.7.
Beads
The
beads came with Columbus in 1492 for trading with the Native Americans. They
were usually manufactured in Italy and the Czech Republic. This was the start
for a new technique to decorate clothes and other objects made of buckskin.
Also new designs were invented due to the variety of colors available. The
beads vary in size. 6/0 to 9/0 are so called Ponybeads and size 10/0 to 16/0
are called Seedbeads. The bigger the number, the smaller are the beads. It
is recommended, that you use beads with a size from 12/0 or 13/0. Bigger ones
can also be used, when you plan to work on a larger object like decoration
for a saddle. If you plan to make authentic replicas, you have to search for
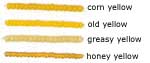
the right beads with the correct color.
white: commonly used
yellow: transluctant, found in various shades
red and pink: in ancient times a deep burgundy red was favored; more
recently a transparent red was used. An old rose was also used which was often
called "Cheyenne pink" and was most popular in the Northern Plains,
Crow and Plateau beadwork. Rose white inside was found throughout the tribes:
transparent red- or rose-tone with a white core.
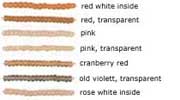
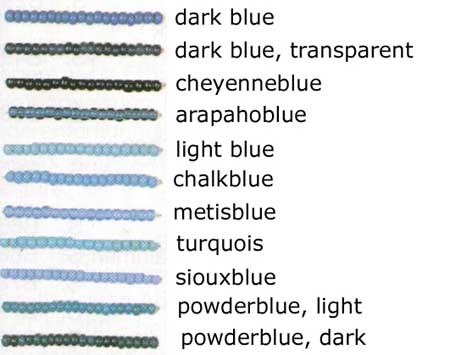
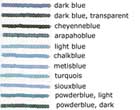
blue: the color ranged from light ultramarine blue, light turquoise
blue or gray blue through the middle ranges of bright royal blue to navy blue.
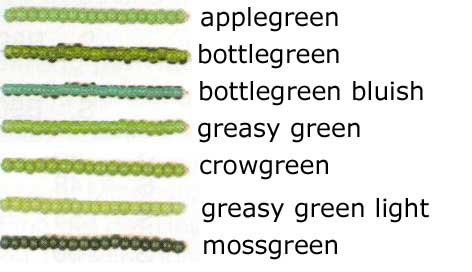
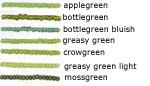
green: light green or apple green
as well as a transparent bluish bottlegreen.
black: black was only used in the Middle West and Plateau tribes and
in the sacred beadwork of the Cheyenne.
If you tend to contemporary beadwork you can choose from a lot more colors
to create your motives.
2.8.
Thread
I
found out, that using a perlon thread with 0,2mm in diameter is best working
with. You can try to use a normal twist, but the danger of getting knots while
working is extremly high. Waxing the thread is only little help. The perlon
thread is easy to use, but you also have to be careful. If a certain spot
is a little stretched it is endangered of getting knots. Beside that it is
easier to use than a common thread, especially when it comes to making a start
with your beadwork.
2.9.
Sinew
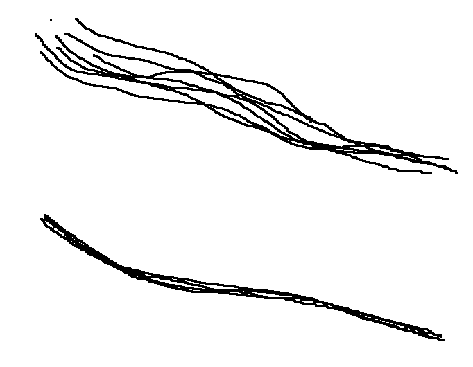
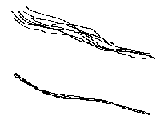 TOP: loose fibers --- BOTTOM:
waxed fibers
TOP: loose fibers --- BOTTOM:
waxed fibers
For sewing several parts of leather together, I recommend a sinew. When you
splice the sinew to get a thinner thread, it is adviseable to use beeswax
to smoothen the fibers: the best is to pull the whole length of the thread
several times through a wax-cake.